Jon's Big Project
Monday, May 2, 2011
Tuesday, April 19, 2011
Tuesday, April 12, 2011
Making Progress
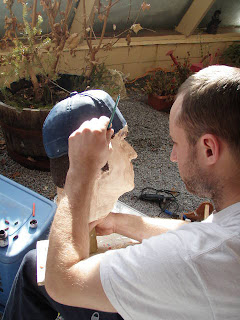
On to the head...This aspect actually went quite rapidly, and I picked up some momentum. You can see where I glued on the tip of the nose, as well as the cap brim. Other than that however, the carving was mostly pure subtraction. Fortunately I was also able to do this part outside, so I was basically done roughing out the carving before the snow began to fly.
On the right is also a good example of how I worked, clamping the work down with a vise and using an angle grinder to do the rough shaping.
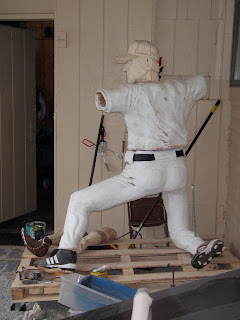
Before long it was time to give the whole sculpture a chance to be seen all in one piece. Although I prefer doing the work in pieces because of convinience, the disadvantage is that until this moment you don't really know how it will look...At this point I was in a good spot. Clearly there are some issues, but I expected to have to work at it, and I had a good sense of how to proceed.
Adding the Details:
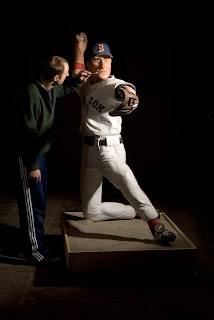
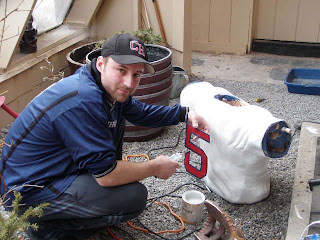
Placing the numbers and team name on the sculpture is the first step in a transformation. Suddenly it's not a block of wood, it's starting to be recognizable as cloth, and there is a visual shift in the way the mind interprets what the eye sees. It's slow, careful, but certainly worth it.
After the number was applied, and the jersey complete, the process of painting the skin began. I figured it would go quickly, but I was in for a surprise. I soon discovered that our skin is made up of many colors, and that unless I wanted Nomar to look like a plastic toy off the shelf (and have little realism), I would have to invest much more time. My first effort involved three coats of paint, and I was satisfied. To me it looked fine...but thank God for independant critiques! When I displayed my work to my peers, it was decided that the skin was too light, had little contrast, and needed work. Back to the drawing board...or the mixing tray. I jumped into many different colors, experimenting with brushes, my finger, watered down pigments, and any technique that might help. All told there are about six or seven coats of paint on the face...and each one led me closer to the finished product.
I would finally say that this trial and error process was made much easier by having a head that could be removed and taken to different locations and work spaces.
Tuesday, February 15, 2011
Taking Shape
After spending much time on the legs and torso section of my sculpture, I am nearing what will be its final shape.
Because of its weight, I "dug out" probably 30 lbs from the base of the torso, so that it now more or less a hollow cavity. Ready to move on, I next decided to tackle the right hand. Hands seem to go quickly in my experience, and this project was no different. In about six hours I had the finished shape, including the wrinkles. I think going from carving a huge section of wood (like legs or torso) back to small pieces(hands) adds a certain variety to the overall experience.
A tricky part of constructing each limb separately is that in the end they may not all proportionally match each other. The hand came out slightly large, but not enough to make it really stick out.
As for the left hand (the glove hand), it was constructed well ahead of time, and with far more tedium than any other part of the project so far. Now I must find arms to connect to my hands, so it's back outside to find a suitable log for the job.
Thursday, February 3, 2011
Thursday, January 27, 2011
Refining the process
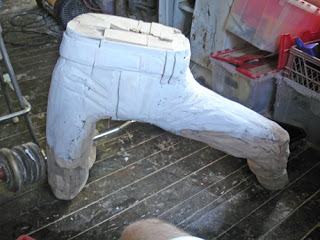
Some of the more interesting areas to carve were details like the belt, belt loops, and folds in the uniform. At this point I am beginning to understand both the capabilities and characteristics of both my medium and my tools. It may also be apparent the there is a bar with weights on it in the background, laying over the right leg. This is because the construction so far is very heavy and wants to fall forward. Before long I decided to build a substantial base, and give the lower body a permanent, and more stable resting place.
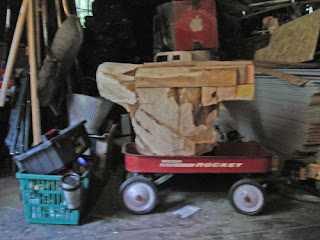
The Torso: The primary chunk of wood I would decided on for the torso was discovered on a neighbor's front yard. It was part of a thick tree, sugar maple as I later learned, and was just the right size. Thus, utilizing the same lamination technique, I assembled a rough
torso shape. This time however, I loaded the extremely heavy block onto an old cart that could be moved inside or outside, allowing me more workplace versatility. When I began this section of work, I estimate that the torso weighed 90-100 lbs. I therefore began brainstorming ways to reduce this weight issue, both for ease of transportation, and overall structural stability.
Thursday, January 20, 2011
From the ground up
My artist statement: For centuries people of all ages have been drawn to sporting events. Competition is a thread that runs deeply through our society, and my art reflects this phenomenon. More specifically I explore how simple games have become tremendously meaningful to our human experience. Metaphor, being a fan, and the making of memories are important themes in my work. Each piece, weather carved or painted, exudes the passion, drama, and emotion that encompass our desire to participate in sporting events, both as an athlete and an avid spectator. By examining these themes, we better understand a vital part of what makes us human.
When considering the direction I would take for my senior project, I knew fairly quickly what form this project would take. As a woodworker and a sports fan, I have sculpted dozens of small sports figures in various actionn poses. My competency grew slowly, and my last five were many times better than my first five. Thus the logical next step was to transform this knowledge of human porportion, the behavior of clothing, and action poses to a grander scale. More specifically, a life-size scale.
Materials: My hunt for materials began early last June. My sculpture was to be almost entirely of wood, and I didn't want to spend a fortune on materials. Therefore I took a hand saw and headed into the woods behind my house. There I found a thick, bent piece of dead hardwood, that would serve as the left leg of my figure. I continued in this fashion until I had found most of the raw material I would need for the project. Some pieces came from my yard, but others came from felled trees in neighbors' yard. I found pine, maple, poplar, and basswood.
At this point I began the process of finding visual material from which I would carve. I gathered pictures from magazines, photocopied from books, and even found some of my old toys that would help me with the particular stance I had invisioned. I drew out some ideas, as well as carved a small model as a guide.
My last goal was to gather the necessary tools I would need. I purchased a number of power tools that would help my project, and because my materials were more or less free, the purchase price was an acceptable investment.
Carving and Assembling
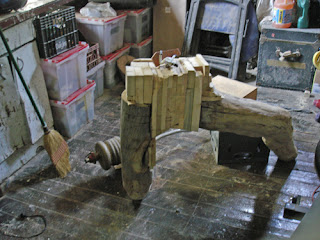 For one reason or another, my style has always been peace meal. That is, to carve each limb separately and assemble at a later time. This process saves space, allows for multiple work stations, and is easier for me to visualize. Thus I began with the lower body; sawing, grinding and shaping the wood into approximate proportions. I also made use of a laminating process, as seen on the right, to shape the core and waist of the figure.I used a lot of wood glue, and some filler when needed.
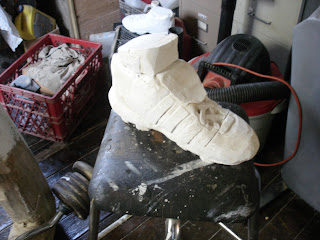
A strategy that helped move things along was a plan to shift to a different body part if I was experiencing slow going. For instance, I carved a foot while taking a mental rest from the legs and torso.
One practical complication was the amount of sawdust I was creating. I was using tools that generated a lot of airborn dust, and cleaning up thoroughly took a lot of time. I then decided it would be more prudent to work outside whenever possible.
Taking Shape
A little bit at a time, the legs began to look like legs, and the rear end started to take shape. I also rediscovered an interesting phenomenon: The process of doing 7 hours of work spread out over a week can be more effective that 7 hours spread over two days. It seemed every time I stepped away, then returned to the project, I saw it a little more clearly. Just that small break enabled my eyes to more readily see what area needed improvement, and how to make those improvements.
One area of concern was in joining the legs to the core. I decided to use a "peg" system, and by drilling and inserting dowels, I created a strong joint.
Once my legs were joined, I began trying to sand and clean up the surface. The old, dead tree had many imperfections, and the texture was unsatisfactory. One technique that helped in this process was to white prime the wood completely. That way I could very clearly see , without various shades of wood interfering, areas that were rough or gaps that needed to be filled. If doing it over, I would have done a better job of assembling the base, because I ended up taking a lot of time filling in voids.
When considering the direction I would take for my senior project, I knew fairly quickly what form this project would take. As a woodworker and a sports fan, I have sculpted dozens of small sports figures in various actionn poses. My competency grew slowly, and my last five were many times better than my first five. Thus the logical next step was to transform this knowledge of human porportion, the behavior of clothing, and action poses to a grander scale. More specifically, a life-size scale.
Materials: My hunt for materials began early last June. My sculpture was to be almost entirely of wood, and I didn't want to spend a fortune on materials. Therefore I took a hand saw and headed into the woods behind my house. There I found a thick, bent piece of dead hardwood, that would serve as the left leg of my figure. I continued in this fashion until I had found most of the raw material I would need for the project. Some pieces came from my yard, but others came from felled trees in neighbors' yard. I found pine, maple, poplar, and basswood.
At this point I began the process of finding visual material from which I would carve. I gathered pictures from magazines, photocopied from books, and even found some of my old toys that would help me with the particular stance I had invisioned. I drew out some ideas, as well as carved a small model as a guide.
My last goal was to gather the necessary tools I would need. I purchased a number of power tools that would help my project, and because my materials were more or less free, the purchase price was an acceptable investment.
Carving and Assembling
 For one reason or another, my style has always been peace meal. That is, to carve each limb separately and assemble at a later time. This process saves space, allows for multiple work stations, and is easier for me to visualize. Thus I began with the lower body; sawing, grinding and shaping the wood into approximate proportions. I also made use of a laminating process, as seen on the right, to shape the core and waist of the figure.I used a lot of wood glue, and some filler when needed.
A strategy that helped move things along was a plan to shift to a different body part if I was experiencing slow going. For instance, I carved a foot while taking a mental rest from the legs and torso.
One practical complication was the amount of sawdust I was creating. I was using tools that generated a lot of airborn dust, and cleaning up thoroughly took a lot of time. I then decided it would be more prudent to work outside whenever possible.
Taking Shape
A little bit at a time, the legs began to look like legs, and the rear end started to take shape. I also rediscovered an interesting phenomenon: The process of doing 7 hours of work spread out over a week can be more effective that 7 hours spread over two days. It seemed every time I stepped away, then returned to the project, I saw it a little more clearly. Just that small break enabled my eyes to more readily see what area needed improvement, and how to make those improvements.
One area of concern was in joining the legs to the core. I decided to use a "peg" system, and by drilling and inserting dowels, I created a strong joint.
Once my legs were joined, I began trying to sand and clean up the surface. The old, dead tree had many imperfections, and the texture was unsatisfactory. One technique that helped in this process was to white prime the wood completely. That way I could very clearly see , without various shades of wood interfering, areas that were rough or gaps that needed to be filled. If doing it over, I would have done a better job of assembling the base, because I ended up taking a lot of time filling in voids.
Subscribe to:
Posts (Atom)
